Audimodif : MMI - mUlti media INTERFACE

Mise à jour MMI 2G
dimanche 13 novembre 2011
Pour les propriétaires d'A6 / A8 / Q7 ... il existe une mise à jour pour le MMI v34.60
- Correction des bugs concernant le DSP Bose (coupure de son et bouton son inactif)
- Ajout du mode BirdView 3D du GPS (fonctionne aussi avec la cartographie 2006)
juste pour info: il faut au moins la version 2120 pour passer en 3460.
Il me restera un coup de valise pour réactiver le gestionnaire. Ajout de 32 au canal 02.
Le CD de mise à jour est le : 4F0 906 961 AB
Marche avec le DVD Map europe 2006 ref : 4EO 919 884 AF
et le DVD Map europe 2007 ref : 4EO 919 884 AL
Sauf erreur de ma part, il faut passer en 2120 avant de pouvoir passer la mise à jour 3460
Est-ce vrai quelle que soit la version initiale ? Car sur mon A8 4E de Novembre 2002, le MMI est en version 770 (c'est pas récent !)
=> est-ce qu'il faut passer par une version intermédiaire ou peut-on passer directement de 770 en 2120 ?
(Le CD de mise à jour pour la 2120 est le 4E0 906 961 L : est-il encore disponible chez Audi ?)
J'ai consulté divers forums parlant des diverses versions du MMI et à priori tu peux passer en 2120 direct.
extrait d'une réponse vue sur un forum:
'As confirmed by Conkerts IT IS POSSIBLE TO UPDATE from old versions like 0360 to 2120'
salut à tous ,
nicodep le cd update pour la version 3460 n'est pas le 4F0 906 961 AP mais le 4E0 906 961 T et ......pour passer a la version 3460 il FAUT avoir minimun la version 2120 !!!!
zeb b avois moi un MP , pour la mise à jour de ton A8 avec ton soft 0770 !!!

Make updates to 3 steps:
1. use SW: 21.2.0
2. then use the SW: 51.5.0
3. the end use SW: 55.7.0
That is the safest.
WIKIPEDIA:
http://en.wikipedia.org/wiki/Multi_Media_Interface
Criticisms
While intuitive and user-friendly, MMI can be difficult to operate when driving. A sequence of menus may need to be accessed in order to change a particular setting, such as radio station, rather than having a dedicated button designated to such a function. This can make changing a setting both time-consuming and arguably hazardous under certain circumstances, where the driver is distracted from the road. It must be said, however, that this concern can also apply to other dashboard interfaces and even conventional dashboards.
altered.
-
•MMI featuring DVD based navigation has a DVD disc drive located in the boot/trunk. This is used exclusively for navigation and contains the navigation software DVD.
http://www.fileden.com/files/2007/3/13/883667/audi.tb.91-07-22.pdf
Verify that the software level in 07 - Display control unit is 1070. If this is not the case, contact the Audi Technical Assistance Center for further instruction.
Version History
European / ROW (Rest of the World) versions:
-
•0890 (0.8.90) -
-
•1190 (1.1.90) -
-
•1200 (1.2.00) -
-
•2120 (2.1.20) - {Update CD p/n 4E0 906 961 L}
-
•3460 (3.4.60) - {Update CD p/n 4E0 906 961 T}
-
•4220 (4.2.20) - {Update CD p/n 4E0 906 961 AA}
-
•5150 (5.1.50) - {Update CD p/n 4F0 906 961 AB}
-
•5170 (5.1.79) -
-
•5570 (5.5.70) - {Update CD set p/n 4L0 998 961 (A6/A8/Q7) or p/n 8K0 998 961 (A4 B8/A5)}
Update v2120 4E0 906 961 L
posted Aug 10, 2010 6:51 PM by n o [ updated Aug 11, 2010 2:31 AM ]
For 4F chassis but also should work with A8 (4E chassis) ( EU version )
Improvements:
-
•Allows higher volume.
-
•Prevents loud sound volume while operating.
-
•The Navi-announcements can be turned off during phone conversations.
-
•Volume of the background music during a Navi announcement.
-
•Height information can be displayed in the Navikarte.
-
•Support SD card for uploading Route by the MMI control knob.
-
•Crosshair on input card is easier.
-
•Additional display arrows for the direction in which the points of interest lie in the search for a POI.
-
•Better labeling of highway exits at low zoom levels.
-
•Voice control and navigation of the top destinations are now available.
-
•Bluetooth: access to more phone book memory.
-
•Bluetooth PIN configurable.
Disadvantage:
-
•Sound setting DSP Driver / Symmetric is not saved. Always remains on Symmetric
-
•Vehicles with DSP may have a catastrophic failure of all speakers. Ignition off for a long time to fix the problem."removing the protection unit"
Update v 2830 4E0 906 961 N
posted Aug 11, 2010 2:24 AM by n o [ updated Aug 11, 2010 3:02 AM ]
This update CD is EU version for mmi system. It is for 4F chassis and similar to 2120 version.
Some values will change after updating like:
The climate screen vision will disappear and you need VAG or VAS to display again by changing value of 1 to 33 in channel 11 address 07.
Advantage:
-
•Fixes DSP issue when forgets DRIVER / SYMMETRIC setting.
-
•You can select a POI from the GPS to dial up a phone number directly.
Update v 3460 4E0 906 961 T
posted Aug 11, 2010 2:49 AM by n o [ updated Aug 12, 2010 9:39 AM ]
This update CD is EU version for mmi system of A6.
The main major change is the Bird-View (3D maps) for navigation.
The climate adjustment will disappear form screen as well as the battery meter.
Source: translation of a6-wiki.de
Here is the componant updates:
control unit of display 4L0 910 732 /D SW 3460
CD CHANGER 4L0 910 111 A SW 0100
MP3 4L0 910 110 SW 0270
RADIO 4E0 910 541 Q SW 0620
STANDARD AMP 4L0 910 223 B/C SW 0100 AND E=0130
BOSE AMP 4L0 910 223 G SW 0150
MOBILE PHONE PREP 4E0 910 336 H SW 0700
BLUETOOTH PHONE 4F1 910 336 A SW 0710
AMI 4E0 910 785 SW 0170
FIXED FACTORY PHONE SW 0770
TV 4E0 910 146 B SW 0360
HYBRID TUNER 4E0 910 146 B SW 0360
DAB 4E0 910 563 C SW 0830
Comments
n o - Aug 12, 2010 5:19 AM
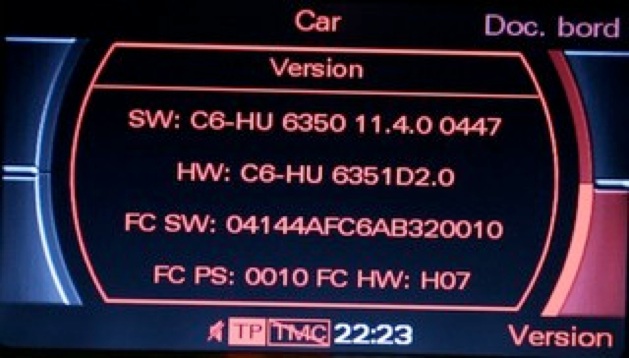
Someone reported that this CD updates v 4080: ;(
HW: C6-HU 40.8.0 0646
SW: C6-HU 6351D2.0
FC PS: 0870
FC HW: H07
n o - Aug 12, 2010 6:18 AM
Note that SW v 3360 is US version
Update v 4220 4E0 906 961 AA
posted Aug 11, 2010 3:04 AM by n o [ updated Aug 12, 2010 10:54 AM ]
This update CD is EU version for MMI system of A6.
-
•Updates the AMI unit from SW 170 to 700 to make it able to support USB media AMI.
-
•Enhance the graphics of the MMI.
-
•Update bluetooth phone preparation to SW 0950.
The climate adjusment option may disappear from display.
Source: translation of a6-wiki.de
Here is example of Q7 update:
control unit of display 4L0 910 732 /D SW 4220
CD CHANGER 4L0 910 111 A SW 0100
MP3 4L0 910 110 SW 0350
RADIO 4E0 910 541 Q SW 0620
STANDARD AMP 4L0 910 223 B/C SW 0100 or 0250
BOSE AMP 4L0 910 223 G SW 0150
MOBILE PHONE PREP 4E0 910 336 H SW 0950
BLUETOOTH PHONE 4F1 910 336 A SW 0900
AMI 4E0 910 785 SW 0700
FIXED FACTORY PHONE SW 0770
TV 4E0 910 146 B SW 0300
HYBRID TUNER 4E0 910 146 B SW 0400
DAB 4E0 910 563 C SW 0830
Update v 5150 8T0 906 961
This update CD is EU version for mmi system of A6. (should be also for A8)
Update AMI to 0850 and enable the integration of new iPod without reflicts.
USB supports wav and acc media files.
Bluetooth SW stike with SW 0950.
You may have diffecalties with updating bluetooth cell phone (cald handyvorbereitung2). Just repeat the update as needed until it is updated.
Kombii instrument may disappear.
Retain it the following:
Hint: Be carefull with the following,
Unlock the Hidden Menu by VAG tools
Address 07 > STG (display,front or head unit) then go to channel 10 > change value 11 to 01 .....not sure of these numbers
Restart the MMI by updating value 111 to "a" or by monkey grib ;)
Enter updating mood "Hiden menu" which will in green
Select Setting > APK 0x01, 0x0B , 0x0C
select the computer brand and battery indicator.
Apply the changes.
Source: translation of a6-wiki.de
For Audi cars that have problem with woofen on sounds, update the audio amplifier by a new SW for update CD 8K0 906 961 A
or you may need to remove the components protection by the dealer with the subwoofer if you'r unlucky.
======================================
A list of component from Q7:
CONTROL UNIT 4L0 910 732 /D SW 5150
CD 4L0 910 111 A SW 0100
MP3 4L0 910 110 SW 0390
RADIO 4E0 910 541 Q SW 0620
STANDARD AMP 4L0 910 223 B/C SW 0100 or 0270
BOSE 4L0 910 223 G SW 0150
PHONE PREP 4E0 910 336 H SW 0950
BLUETOOTH 4F1 910 336 A SW 0960
AMI 4E0 910 785 SW 0840
FACTORY PHONE SW 0770
TV TUNER 4E0 910 146 B SW 0310
HYBRID TV 4E0 910 146 B SW 0440
DAB 4E0 910 563 C SW 0830
Note:- Updating the bluetooth may be interupted ending with serious firmware damage. This happens due to "Gateway 500" model (like Q7). You should disable this particuler gateway while updating by a VAS or VAG or do not update the bluetooth (if you have luck). After updating complete turn on the bluetooth.
=======================================
Bluetooth supports more phones like nokia N95
Comments
n o - Aug 11, 2010 5:18 PM
It is said to be ok to update from 1110 to 5150 directly
n o - Aug 12, 2010 3:48 AM
8K0 906 961 version 5170 is released for A4(B8) and A5(B8)
n o - Aug 12, 2010 4:56 AM
The MP3 changer will have SW 0390 which gives more details for songs
and handy will have SW 0950
n o - Aug 12, 2010 5:39 AM
"All who wants to update yours MMi HIGH components (A6,A8,Q7) from version 0770 to 5140/5150 can use a CD 8T0 906 961 on once update, only if your software version on head unit(address 07) is under 0770 and Telefon (address 77) is under
0650 use CD 4E0 906 961H after that CD 8T0 906 961.All other CD not necessary any more."
audiforum.us
n o - Aug 12, 2010 2:16 PM
Up dating phone to 960/950 can kill the the bluetooth unit
Bypass the phone or dont update from sw 700/710
n o - Aug 12, 2010 4:10 PM
You will get an error massage if you can not jump to 5150 in one jump.
Then update to 1110 or 2120
Update v 5570 ET 4L0 998 961
CD de mise à jour uniquement pour la version Europ
Valable pour MMI A6, A8 and Q7.
La mise à jour contient 3 CD :
CD1: updates vers 5150 ( nécessaire pour les anciennes version )
CD2: updates du Bluetooth et des applications téléphone (15 mins)
CD3: updates AMP, TV, MP3, MMI SW et tuner (25 mins)
Changement apparent :
-
•Update Radio de 0620 à 0630.
-
•Multi-clic sources (CD, TV, AMI, AUX...) en appuyant sur le même bouton.
-
•Lecture des fichiers m4a mais plus de lecture possible de mp3.
Notes: 8K0998961 est une vesrion de mise à jour v5570 pour A4, A5. (CD2 identique)
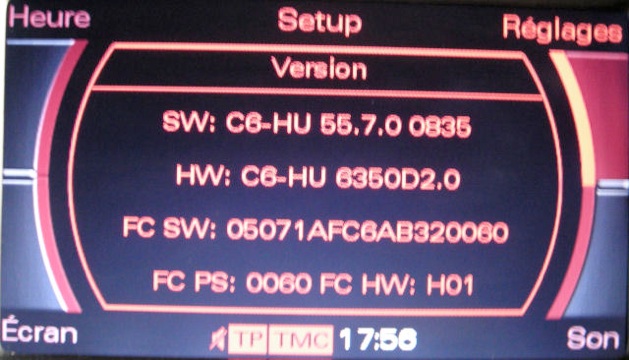
Audi MMI firmware update 55.7.0
IMPORTANT :
Si votre véhicule est déjà en version 51.5.0 vous n’avez seulement besoin que des Cd 2 & 3.
Si votre version est antérieure à la 51.5.0, vous devez impérativement démarrer avec le Cd 1.
Voici la méthode pour effectuer la mise à jour :
- Enlever au préalable tous les disques présents dans le chargeur.
- Insérer le Cd (suivant votre version actuelle, voir plus haut) dans le premier compartiment du chargeur CD.
- Appuyer sur les boutons SETUP et RETURN en même temps et conserver l’appui pendant 3 à 5 secondes jusqu'à l’apparition du menu de mise à jour sur l’écran du MMI.
- Appuyer sur « Mise à jour » (touche en bas à droite).
- Sélectionner comme source CDROM et attendre la « lecture Meta information ».
- Aller en bas du menu et sur la ligne « Lancer le téléchargement « faire « OK » et suivre les instructions à l’écran.
- Après avoir terminé avec le Cd1, rebooter le MMI, enlever le Cd1 et insérer le Cd2 à la place.
- Répéter la même opération que pour le Cd1 (setup+return /3-5 secs…).
- Le Cd2 comporte des modifications concernant le Bluetooth du module téléphone GSM.
- La procédure pour le cd2 doit être faite en deux passes car la première mise à jour concerne le MAIN4/App , rebooter le MMI.
- A la seconde passe du Cd2, la mise à jour ajoute le MAIN6/App du module GSM, rebooter le MMI, et insérer le Cd3 à la place.
- Si vous n’effectuez pas la mise à jour en 2 passes le module Bluetooth sera désactivé, pas d’inquiétude toutefois, vous pouvez le faire à tout moment.
(Sur mon A6 3.0 Quattro Tiptro de 2007, le module Bluetooth ayant été déjà activé d’origine, je n’ai pas eu besoin de faire la 2eme passe.)
- Effectuer les mêmes opérations qu’au Cd1 (setup+return /3-5 secs…), au final le Cd3 va faire la mise à jour des éléments propres à votre véhicule : Digital tv tuner, Bose system, etc.)
Ne pas oublier de rebooter le MMI avant d'éjecter chaque Cd !
Cette mise à jour n’apporte aucune autre fonctionnalité par rapport à la 5150, juste la résolution de certains bugs dans le MMI.
Elle est recommandée par Audi.
Les disques de mise à jour peuvent être achetés chez votre concessionnaire Audi pour environ 6 €, ils peuvent évidement vous faire la mise à jour mais au tarif en vigueur ! (time is money).
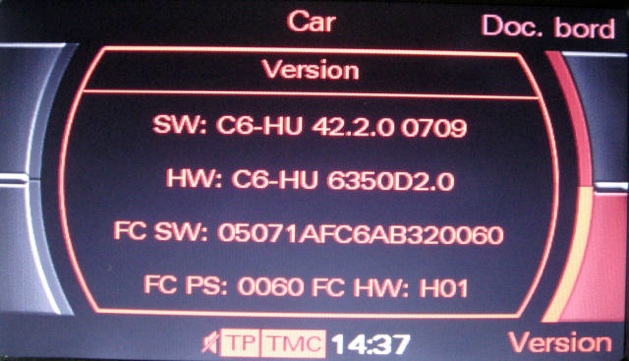
Photo avant mise à jour :
La mise à jour (4220 vers 5170) m’a pris 1h40, le 2eme Cd n’ayant eu besoin que d’une seule passe :
Update instructions for the MMI High update
MMI update programming for vehicles equipped with MMI High, e.g. A8 (4E), A6 (4F), Q7 (4L), A5 (8T), and A4 (8K) via the on-board CD drive with feedback documentation via Software Versions Management (Audi SVM):
www.audiclub.dk/forum/download/file.php?id=8017
Update instructions for the MMI High update
MMI update programming for vehicles equipped with MMI High, e.g. A8 (4E), A6 (4F), Q7 (4L), A5 (8T), and A4 (8K) via the on-board CD drive with feedback documentation via Software Versions Management (Audi SVM)
The steps which have to be carried out are explained in the Business TV episode 191/2002. See the film in a format which can be played on a Windows Media Player on the update CD 420906961B.
Also see the iTV programme 2345 about Online flashing and SVM. The iTV programme is on the following update CDs: CD 8D0906961C, 8Z0906961B, and also 8N0906961A .
Contents
1.Overview of controls .......................................................................................................3 2.Important information about update programming..........................................................4 3.Carryingoutupdateprogramming ..................................................................................6 4.Changing the language of the MMI speech dialogue system (SDS).............................12 5.USB – consumer update for the Audi music interface (AMI) .......................................18 6.SVM feedback documentation......................................................................................19 7.Table of figures.............................................................................................................28
1. Overview of controls
Figure 1: Controls (depending on vehicle type)
␣ ON/OFF button with volume control ␣ Rotary pushbutton ␣ RETURN button ␣ Function selector buttons
␣ Control buttons ␣ Arrow buttons ␣ Fingerprint (not used in these instructions)
2. Important information about update programming
Attention:
␣
␣ (Failure to observe these instructions can cause hardware faults!) ␣ Do not leave the flash CD in the vehicle!
Check that your software meets the requirements for update programming.
Requirements: 1 MMI flash CD (get the part number from the relevant TPL episode or step instructions).
1. Check that the no-load voltage of the vehicle battery is at least 12,5V.
2. Let the engine run for 1 minute and then immediately continue with update according to the instructions.
3. Connect a battery charger (VAS5095) to maintain vehicle voltage through out the entire update programming session.
4. Switch off all equipment with high electromagnetic emission values (such as mobile telephones or cordless land-line telephones) in and around the vehicle.
5. The Bluetooth handset (included with factory-installed Bluetooth car phone BTA) must be switched on.
6. Diagnostics using the VAS tester must not be run in parallel.
7. The ignition can be switched off and remain off.
8.Switch off all unnecessary electrical equipment (daytime running lights, air conditioning, etc.) in the vehicle and leave it switched off until all update programming has been completed.
9. EnsurethatnootherCDs(audioCDs,electronicon-boardhandbook,etc.)areinthe CD drives while running update programming.
10. It is essential that you adhere to the flash sequence!
After each update, the MMI system must be restarted and checked if there
are still control units that need updating. This is necessary because some
control units can only be updated in the second step.
Note: The screen shots in these instructions are for your information only, i.e. the texts shown here are not necessarily identical to the texts you will see on your display.
If problems should occur during the MMI software update, you can find
important information about possible sources of error in the Audi Servicenet
under "Technology – Product support – Electrical – Multi Media Interface (MMI)
– MMI High".
3. Carrying out update programming
1. Switch on MMI.
2. Remove all CDs from the CD changer/CDplayer.
3.Put the MMI update CD into the first slot of the CD changer or the CD drive with the label facing up.
4. Wait at least 2 minutes to allow the system to analyze the MMI update CD and for the MMI System to be
ready to be updated.
5. Activate the RADIO menu by pressing the corresponding function selector button.
6. First press SETUP and then RETURN and hold both buttons down simultaneously for about 5 seconds until the display changes.
7. Activate the SW update by pressing the bottom right control button.
Figure 2: Selecting the SW update using the bottom right control button
8. Activate the update from the CD-ROM by pressing the rotary push button.
Figure 3: Selecting update of CD-ROM by pressing the rotary pushbutton
9. Wait at least 20 seconds while the Meta information is being read.
Figure 4: Waiting while the Meta information is being read
10.Select and activate "Standard" using the rotary pushbutton.
Figure 5: Selecting "Standard" using the rotary pushbutton
11.The list which now appears shows all the devices which can be updated.
Figure 6: List view of the devices to be updated
Type of change: N/A= No update information available on the present CD N= No update required E= Single update (partial update: bootloader or application) will be performed J= Bootloader and application will be changed (complete update)
12.Using the rotary pushbutton, select and confirm ”Start download” at the end of the list.
Figure 7: Activating Start download using the rotary pushbutton
13.Read the note if one appears. Then select and activate "OK" at the end of the list using the rotary pushbutton (this only appears in the case of a bootloader update of a component).
Figure 8: Start download by selecting "OK" using the rotary pushbutton
Note: A warning message may appear informing you about the risk of damaging control units. You can ignore this message at this point.
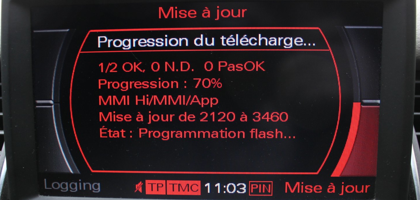
14.Update programming for the individual infotainment components now starts; this can take up to 50 minutes, depending on the vehicle equipment.
Figure 9: Download progress during update programming
15.The display automatically shows ”Start applications” when update programming is completed. Wait until the listed devices have been initialised.
Figure 10: Starting applications after update programming
16.The programming success is displayed in the overview which follows.
Figure 11: Displaying the update programming success
17.Use the rotary pushbutton to scroll down the list. If a device has not been programmed properly ("NotOK), select "Try again?" and start the update again by activating "Start download". If one of the control units cannot be flashed using this procedure (testing 2-3 times), please proceed with the next step in the instructions. Note: If the status "OLD" appears after updating the telephone control unit (UHV) , please proceed with the next step of the instructions.
Figure 12: Update programming successful
18.Normally, every updated device is OK and you can select and activate "Restart MMI" at the end of the list.
Figure 13: Final screen after successful update programming
Important When restarting the MMI, an additional download must be started (with a 2 minute waiting time) after each update programming. Check and see if additional update programming is necessary. The download is actually finished when there is no longer a device in the list view of devices to be updated displaying a "J" or an "E" (see Figure 6: List view of the devices to be updated). This applies to all update programming!
wait 2 minutes
19.After restarting the MMI(so that all devices have time to log on to the system) and check that none of the control units needs an additional update.
Note: The process is necessary after every download to ensure correct system status.
20.You can use the infotainment components again afterwards, or switch the system on or off with the on/off button.
Note: If no final screen appears (see Figure 13: Final screen after successful update programming) and the MMI restarts automatically with user input, the update must be carried out once again as described in Chapter 3. The final screen, however, can also appear in English, depending on the previous status of the components. In this case, select "Restart MMI".
4. Changing the language of the MMI speech dialogue system (SDS)
Note: If you wish to change the language setting for the speech dialogue system (SDS), please perform the following steps; otherwise, go straight to the next chapter.
Please inform the customer that after changing the language of the speech dialogue system the name tags allocated by the user (names for radio stations, CDs and directory entries) will no longer be usable. They must be deleted in the MMI using the "Setup␣Settings␣Speech dialogue system␣Delete all name tags" (see operating manual).
1. SwitchonMMI.
2. RemoveallCDsfromthedrive.
3. PuttheMMIflashCDintothefirstslotoftheCDchangerortheCDdrivewiththe label facing up.
4. Waitatleast10secondstoallowthesystemtoanalysetheMMIflashCD.
5. ActivatetheRADIOmenubypressingthecorrespondingfunctionselectorbutton.
6. FirstpressSETUPandthenRETURNandholdbothbuttonsdownsimultaneously for about 5 seconds until the display changes.
7. ActivatetheSWupdateviathecontrolbutton.
Figure 1414: Selecting the SW update using the bottom right control button
8. ActivatetheupdatefromtheCD-ROMbypressingtherotarypushbutton
Figure 15: Selecting update of CD-ROM by pressing the rotary pushbutton
9.Wait for 20 seconds while the Meta information is being read.
Figure 15: Waiting while the Meta information is being read
10.Select and activate "Standard" using the rotary pushbutton.
Figure 17: Selecting "Standard" using the rotary pushbutton
11.Using the rotary pushbutton, select and confirm "SDS D3" in the list that now appears.
Figure 1816: Selecting from the list of SDS devices to be updated
12.Select and activate the menu option "Select language".
Figure 1917: SDS menu option "Select language"
13.Select and activate the desired language by pressing the rotary pushbutton. A tick (checkmark) will appear next to the selected language.
Figure 18: Selecting desired language using the rotary pushbutton
14.Press the RETURN button twice. This will take you back to the selection list. "SDS D3" is not marked with a "Y".
Figure 19: Back to the list of devices to be updated
15.Select and activate "Start download" at the end of the list using the rotary pushbutton.
Figure 2220: Activating Start download using the rotary pushbutton
16.Read the note if one appears. Then select and activate "OK" at the end of the list using the rotary pushbutton.
Figure 21: Start download by selecting "OK" using the rotary pushbutton
Note: A warning message may appear informing you about the risk of damaging control units. You can ignore this message at this point.
17.The update programming will now change the system to the desired language.
Figure 2422: Update programming changes the language
18.The display automatically shows "Start applications" when update programming is complete. Wait until the listed devices have been initialised.
Figure 23: Starting applications after update programming
19.After you have completed the changes to the language setting, select "Restart MMI" (at the end of the list) and activate your selection using the rotary pushbutton.
Figure 24: Final screen after successful update programming
20.Switch the MMI off for 10 seconds and then back on again.
21.The infotainment components will be fully functional after a delay of 3-15 minutes after the first on/off cycle. The new language undergoes internal processing during this time.
22.Changing the language of the speed dialogue system has finished when the Speed dialogue system clearly indicates it is ready by beeping when the speech operation button (PTT button) in the steering wheel has been pressed with the MMI switched on.
23.You can now switch off the MMI again.
Note: If there is a navigation system installed in the vehicle, you also have to change the language for voice messages there.
5. USB – consumer update for the Audi music interface (AMI)
Note: Only applicable to vehicles with PR No. 7D3 or 7D8 Vehicles with Audi music interface (AMI)
A driver update of the AMI is performed using the consumer update. This allows new consumer devices (mobile devices) to be supported and driver conflicts to be rectified.
You can find the current consumer update as well as a detailed description of the update in the Audi Servicenet under “Accessories/Tyres --> Original accessories -> Products -> Infotainment -> Audi music interface“.
Please check to see that the vehicle has the current driver version of the AMI control unit.
6. SVM feedback documentation
The new vehicle configuration must be transmitted to Audi after every software update (also for multi-stage MMI software updates) to support the fault elimination process. For this purpose, the VAS tester is equipped with Software Versions Management (Audi SVM). Connect a VAS 5051 or VAS 5052 which can be used online (with current Base CD and Brand CD version) to the vehicle’s diagnosis socket and link it up with your workshop network CPN.
Note: For later invoicing of the work carried out it is important that the vehicle data is transmitted correctly and completely. For this reason, please answer the questions at the end of Guided Fault Finding regarding workshop order number, chassis number and success of work carried out. Then transmit this information using the online VAS tester. If you fail to do so, the work cannot be billed under warranty.
1. Turn on the ignition.
2. Switch on MMI.
3. Activate the radio menu by pressing the RADIO function selector button.
4. Start Guided Fault Finding.
Figure 25: Starting Guided Fault Finding
5. Select”Audi”asbrand.
6. Selectvehicletype,suchas<AudiA82003>.
7. Thetesterwillnowestablishthevehicleidentification.Ifthetesterdoesnotdoso automatically carry out vehicle identification as usual.
8. Selectengineversion.
9. Followthedirectionsonthescreen.
10.The "vehicle system test" will now be carried out, during which all fault memories will be read. If applicable, follow additional directions on the screen.
11.When all control units have been interrogated, press ”Next” arrow (on bottom right of screen).
12.Use the ”go to function” to select the option ”Function /Component Selection”.
Figure 26: Selecting the function/component
13.Now select "Software Versions Management".
Figure 27: Software Versions Management
14.Highlight ”Problem-related hardware and software update” and then press on the Next arrow (bottom right).
Figure 28: Problem-related hardware and software update
15.In the next menu, select ”Action code: Direct input" and then press the Next arrow (bottom right).
Figure 29: Action code: Direct input
16.On the following screen, confirm "Own test plan" – "Direct input: action code for problem-related update" by pressing the Next arrow (bottom right).
17.On the following screen select the screen button to activate the screen keypad.
Figure 30: Activating the screen keypad
18.Then enter the SVM code listed in the TPL and press the Q key to confirm.
Figure 31: Entering SVM code
19.Then press Next arrow (bottom right). 20.The data for the vehicle’s control units will then be read.
Figure 32: Reading the control unit data from the vehicle
20.The data for the vehicle’s control units will then be read.
Figure 32: Reading the control unit data from the vehicle
21.Please enter your SeCo (GeKo) user ID.
Figure 33: SeCo user ID
22.Please enter your SeCo (GeKo) password. 23.To set up an online connection please press the ”Done” button.
Figure 34: Establishing an online connection
23.To set up an online connection please press the ”Done” button.
Figure 34: Establishing an online connection
24.The data will now be transmitted and evaluated.
Figure 35: Transmitting and evaluating data
25.You will then receive a feedback message from SVM (Software Versions Management).
Figure 36: Feedback message from Software Versions Management
If applicable, you will receive a feedback message to inform you that not all components have accepted the update programming. Should this occur, please go through all steps once again, starting with chapter 0. You can find information about possible feedback messages and associated procedures in the SOST documentation, March 2007 (in the Audi Servicenet under Technology – Product support – Electrical).
26.Exit Guided Fault Finding via the "Go to" function "Quit".
Figure 37: Quitting Guided Fault Finding
27.The fault memories of all control units will now automatically be erased.
28.When you quit the programme, answer the questions regarding workshop order number, chassis number and success of the repair work.
29.Transmit your answers via the workshop network.
30.Switch off the ignition.
31.If satellite reception is poor (e.g. in the workshop) update programming may result in the navigation system losing its location details. For this reason, please check that the navigation system (if fitted) is functioning correctly. To do so, press the ”NAV” button to switch to the navigation menu.
32.Activate the map display via the bottom right control button, located next to the rotary pushbutton (see illustration in chapter 0; button ␣). If a map with the correct vehicle position is displayed, the navigation system has been initialised and you can leave out the next step.
33.If the display only shows an arrow on an empty map, the vehicle must be left standing in the open with the MMI switched on for about 5-10 minutes.
Update programming has now been completed. Remove the update CD from the vehicle. The CD can be used for updates in other vehicles.
Mise à jour MMI

